
Test Clear Synthetic Urine: Complete Guide & Analysis
If you’re reading this, chances are you have a drug test on the calendar—and the clock is ticking. The stress is real, and you need a solution you can trust. Let’s start with the basics.
Test Clear synthetic urine is a powdered synthetic urine kit designed for one clear purpose: to provide a reliable, clean sample for an unsupervised drug test. But what does that actually mean? In simple terms, it’s a dehydrated, real human urine formula. You mix the powder with water to create a fresh sample that mimics the chemical and physical properties of natural urine.
This isn’t a lab-created concoction. The Test Clear powdered urine formulation contains the key natural compounds—like urea, creatinine, and uric acid—that validity tests look for. According to the manufacturer, it’s biocide-free and toxin-free, aiming to pass initial specimen checks for pH, specific gravity, and creatinine levels. The kit gives you enough powder for up to two uses, and its powdered format grants it a reported 2-year shelf life, making it a practical option to have on hand.
The core value proposition is straightforward: a tangible, ready-to-use solution when you need to submit a clean sample. And the Test Clear urine reviews from users reflect this focus on reliability. On the manufacturer’s site, it maintains a 4.7 out of 5-star overall rating, with 93% of customers giving it 4 or 5 stars. Positive feedback frequently highlights the realistic color and smell of the prepared sample.
But why would someone need to use this in the first place?
Why People Use Synthetic Urine: Understanding the Real-World Need
But why would someone need to use this in the first place? Let’s be clear: the decision isn’t made lightly. It stems from high-stakes, real-world situations where the consequences of a failed test are immediate and severe.
For many, it begins with a job opportunity. Pre-employment drug screening is a standard gatekeeper for countless positions, from office roles to skilled trades. Passing isn’t just about getting hired—it’s about securing a paycheck, providing for a family, and getting a tangible foothold in a competitive market. The stakes escalate further in regulated industries like transportation, where Department of Transportation (DOT) rules mandate testing for safety-sensitive roles.
Beyond employment, the need can be legal. Probation or court-mandated testing often comes with zero tolerance; a positive result can mean jail time, not a second chance. In these scenarios, personal freedom hangs in the balance. Similarly, some medical monitoring programs require compliance, tying continued treatment or benefits to a clean test.
Here’s the core frustration for cannabis users: THC metabolites store in fat cells, leading to detection windows of 30 days or more for chronic consumers. This biological reality makes natural detoxification a risky gamble when a test is sprung with short notice. Even when searching for the best way to detox from THC, the body’s natural elimination process simply can’t be rushed to meet a two-week deadline.
That’s why the need for a reliable, immediate solution resonates so deeply. It’s not about circumventing responsibility for on-the-job impairment; it’s about protecting one’s livelihood and autonomy from the consequences of off-duty, legal-in-many-states personal choices. People are seeking a way to align their private lives with their professional and legal obligations.
To meet this urgent need, they turn to specialized products. This brings us to the logical next step: examining what’s actually inside a kit designed to provide that clean sample.
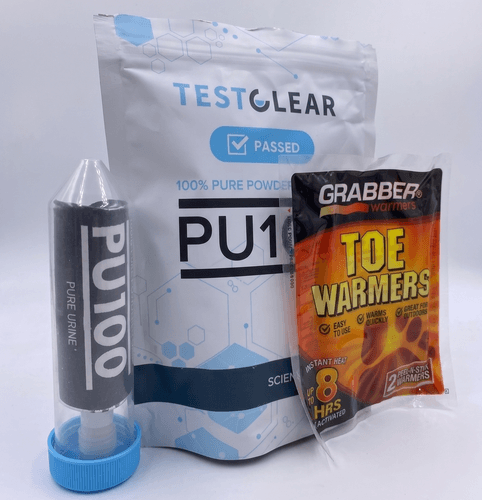
Inside the Test Clear Powdered Urine Kit: Components and Their Purpose
So, what exactly are you getting when you order a powdered urine kit? Think of it as a complete toolkit for urine simulation. The Test Clear Powdered Urine Kit (PU100) is designed as an all-in-one solution, so you’re not scrambling for extra parts. Let’s break down the components of a powdered urine kit and what each one does.
- The Powdered Urine Vial: This is the core of the kit. It’s a small vial containing dehydrated, concentrated urine. Your job is simple: mix this powder with water to create the synthetic sample. It’s formulated to mimic the chemical makeup of real urine.
- The Mixing & Transport Vial: You get a 50ml, medical-grade plastic vial with a secure blue lid. This is where you’ll mix the powder and water. It’s also the container you’ll submit, so it’s built to be discreet and reliable.
- The Pre-Attached Temperature Strip: This is your most critical monitoring tool. It’s already fixed to the side of the mixing vial. Once your sample is prepared, this strip tells you if it’s within the safe submission range—typically 94-100°F. Getting this temperature right is non-negotiable for passing.
- The Air-Activated Heating Pads: The kit includes two single-use heaters. These pads, when exposed to air, generate steady warmth. You attach one to the vial to bring your sample to body temperature and keep it there. They need 30-60 minutes to reach full heat, so planning is key.
- The Instruction Pamphlet: Don’t skip this. It provides the specific, step-by-step guide for mixing and heating. Following it precisely helps avoid the user error that can compromise a powdered urine kit.
You can find this complete kit on the manufacturer’s website. While you might search for powdered urine kit Amazon options, purchasing directly from the source ensures you get the genuine, full component set and the latest formulation.
Knowing the parts is one thing, but using them correctly is what ultimately determines success.
How Does Test Clear Synthetic Urine Work? Step-by-Step for First-Timers
This is the moment where everything comes together. You have the kit, you understand the parts, and now you need to turn that powder into a viable sample. Let’s walk through the exact sequence. Getting this right is non-negotiable.
1. Mixing the Sample
Start by pouring the entire contents of the small powdered urine vial into the larger 50ml mixing vial. Next, fill that vial with room-temperature water—distilled or tap—right up to the fill line. Do not use hot water here. Secure the blue cap and shake gently until the powder fully dissolves. You should see no clumps. This creates your 50ml sample.
2. Applying Initial Heat
For the powdered kit, the primary method is the included heater. However, if you have microwave access, you can use it for a quick start. Remove the cap and microwave the vial for 10 seconds. Check the temperature strip. Repeat in very short bursts if needed, but be cautious. The goal is to get the liquid into the 90-100°F range, not to boil it. Overheating above 100°F can degrade the sample’s chemical makeup.
3. Attaching the Heater for Maintenance
This is the most critical step for maintaining temperature. Activate one air-activated heater and attach it firmly to the back of the vial. It must sit directly opposite the temperature strip on the front. Use a rubber band or tape to hold it snugly. This placement is vital—it prevents the strip from reading the heater’s direct heat instead of the liquid’s true temperature. The heater needs 20-50 minutes to bring the sample to the optimal 96-98°F range.
4. The Final Temperature Check
Right before you walk into the testing facility, you must perform a final, granular temperature check. Look at the strip. You need a clear reading between 94-100°F, with 96-98°F being the sweet spot. If it’s too cool, give the heater more time. If it’s too hot, remove the cap and heater and gently blow on the liquid to cool it. This is your last chance to verify. A sample outside this range is an automatic red flag.
5. Secure Concealment and Submission
Once the temperature is confirmed, secure the vial on your body. The best place is in your underwear, against your groin. This area provides consistent body heat and is rarely searched. It is helpful to understand how long urine stays warm against the body for extra security. The goal is to keep the sample at a stable temperature until the moment you pour it. Remember, the sample cools rapidly once exposed to air, so you must submit it immediately after your final check and after pouring.
Practicing this entire sequence at home is a tangible way to reduce anxiety. It builds muscle memory for the process. But even with perfect preparation, a major worry often lingers: “Will the lab actually detect that this isn’t real urine?” That’s the next crucial piece of the puzzle to address.
The 60-Second Pre-Submission Checklist
You’re in the stall. The door is locked. This is the final verification—the definition of done—before you hand over the sample. A single mistake here can undo all your preparation. Run through these five checks with precision. It’s the last action you take to secure a negative result.
1. Confirm the Temperature Strip Reads 94-100°F.
This is the non-negotiable, number-one failure point. Look directly at the temperature strip on the vial. You should see a clear green indicator or a colored reading within the 94 to 100-degree range. Officially, labs flag samples below 90°F as potentially substituted and above 100°F as artificially heated. Aim for the sweet spot of 96°F to 98°F. If the strip is blank, the sample is outside the 85-100°F detection window—meaning it’s far too cold. If it’s reading over 100°F, you may need to let it cool for a moment by setting it on a cool surface. Wipe away any condensation that might be obscuring the strip for a clear read.
2. Ensure the Powder is Fully Dissolved.
Hold the vial up to the light. The liquid inside should be clear and uniform, with no floating particles, clumps, or sediment settled at the bottom. Any undissolved powder is a red flag for adulteration. If you see clumps, shake the vial vigorously one last time until the solution is completely clear. This step guarantees the sample’s chemical composition will appear natural upon visual inspection.
3. Remove the Seal and Cap Without Noise.
Before you pour, you must remove the blue cap. The goal is to do this silently. A loud snap in a quiet bathroom can raise suspicion. Practice twisting and removing the cap slowly at home to master a noiseless technique. Ensure any protective foil or safety seal is also completely removed so nothing impedes a smooth pour into the collection cup.
4. Detach the Heating Pad.
Once you have confirmed the correct temperature, you must remove the air-activated heating pad from the back of the vial. If you leave it attached, it will continue to heat the sample after you pour it into the collection cup. This can cause the temperature in the cup to rise above 100°F, triggering an automatic flag for an artificially heated sample. Detach the pad and pocket it separately.
5. Wipe the Outside of the Container Dry.
Condensation or moisture on the outside of the vial is a tell-tale sign it’s been heated or stored against skin. It can also make the container slippery and harder to handle discreetly. Use your shirt or a tissue to wipe the entire exterior of the vial until it’s completely dry and at a neutral, room temperature to the touch.
Once these five checks are complete, your sample is ready. Pour with confidence, submit, and walk out. You’ve managed the controllable factors. The next step is understanding what happens once the lab has your sample.
Can Labs Detect Synthetic Urine? What Beginners Need to Know
Let’s address the elephant in the room: the fear that a high-tech lab will instantly spot your synthetic urine and you’ll be caught. It’s a valid concern, but understanding what actually happens behind those lab doors is the first step to managing that anxiety.
Here’s the actionable truth: standard labs like Quest or LabCorp aren’t running a “synthetic urine scan.” They perform a mandatory Specimen Validity Testing (SVT) protocol on every sample. This is a series of checks designed to see if the urine is physically and chemically consistent with normal human urine. They’re looking for red flags, not a specific “fake” signature.
The core markers they quantify are straightforward:
- Creatinine: A waste product in urine. Labs check if it’s within a normal range (typically 20-200 mg/dL). A level that’s too low suggests dilution or substitution.
- Specific Gravity: This measures urine density. It must fall within a normal range (1.003–1.030). Water has a gravity of 1.000, so a number too close to that is a major flag.
- pH: The acidity level. Normal urine ranges from 4.5 to 8.0. A sample that’s too acidic or too basic indicates tampering.
- Visual & Physical Inspection: At collection, the temperature is checked immediately (it must be between 90-100°F). The color, clarity, and odor are also noted. Unusual frothing, a chemical smell, or a water-like appearance will trigger suspicion.
A quality synthetic urine kit, like Test Clear, is specifically formulated to align with these exact parameters. Its powdered formula, when mixed with water, is designed to yield a creatinine level, specific gravity, and pH that fall squarely within normal human ranges. Its yellow color and lack of odor are meant to pass the initial visual once-over.
But the truth is, this entire framework applies to standard, unsupervised tests. This is a critical distinction. For a pre-employment screening at a clinic where you’re alone in the restroom, success hinges on your execution—getting the temperature right and submitting a sample that passes these SVT checks.
This methodology changes dramatically for directly supervised tests, like those for probation, parole, or DOT-regulated jobs. In those scenarios, someone is watching you produce the sample. The game isn’t about fooling the lab’s chemistry; it’s about the collection process itself. Synthetic urine is not a viable or advised option in these cases.
So, for the standard test, the lab’s technology isn’t your primary adversary. The real question shifts from “Can they detect it?” to “Does it work in the real world when I use it?” That answer depends less on lab detection and more on the product’s formula and your preparation.
Does Test Clear Really Work? Factors That Influence Success
Let’s be clear. When you’re staring down a test that could decide your job or your freedom, “Does it actually work?” is the only question that matters. The short answer is: Test Clear’s success isn’t automatic. It hinges entirely on two things—the inherent quality of the product itself, and your precision in using it.
When those two factors align, the success rate is high. But let’s quantify what “aligning” really means.
The Pillars of Success
First, the product’s formula must be sound. Test Clear’s powdered kit is designed to mimic real urine’s key biomarkers—creatinine, pH, specific gravity—when mixed correctly. That’s the baseline.
Your preparation is where the tangible impact happens. Success is built on:
- Following Mixing Instructions Exactly: The powder must dissolve fully in the specified amount of water. Over-dilution is a common error that can lower creatinine levels, flagging the sample as “diluted.”
- Nailing the Temperature: This is non-negotiable. The sample must be between 90°F and 99°F at the moment you submit it. The included temperature strip is your primary tool for verification. A reading outside this range is the single most common reason for immediate rejection.
- Avoiding Detection During Submission: This means using it only for unsupervised tests. If someone is watching you, the game is over. It also means discreetly handling the vial to avoid suspicious noises or visual cues.
The Main Reasons for Failure
Conversely, failure typically stems from:
- Temperature Mismanagement: Letting the sample cool below 90°F or accidentally overheating it above 100°F. Overheating is particularly damaging, as it can degrade the synthetic chemicals, causing the sample to fail validity checks.
- Using it for the Wrong Test Type: Attempting to use synthetic urine for a supervised test (common in probation, DOT, or court-ordered scenarios) is a primary reason for failure and carries severe legal risks.
- Purchasing from a Disreputable Seller: Buying counterfeit or outdated products from unauthorized third-party sellers is a major pitfall. The formula may be ineffective, or the kit may arrive compromised.
Understanding these success factors isn’t about fear—it’s about control. It naturally leads to a balanced evaluation of the product’s overall strengths and its very real limitations, which we’ll weigh next.
Pros, Cons, and Common Objections: Weighing the Trade-Offs
Let’s get granular about the real-world trade-offs. No product is perfect, and understanding both the tangible strengths and the significant limitations of Test Clear is the only way to make an informed, confident decision.
On the plus side, when used correctly, its reliability is its core strength. The powdered form is a major advantage for planning—it boasts a long shelf life, with vendor and user reports indicating the unmixed powder can remain viable for years if stored properly. This makes it a practical option for having a solution on hand for unexpected tests. The kit itself is a self-contained privacy solution, including two adhesive heat pads designed to maintain warmth for up to eight hours and a temperature strip for real-time monitoring. The formulation is described as biocide-free and toxin-free, aiming to pass standard validity checks.
But the truth is, these pros are entirely conditional. The cons present serious, non-negotiable risks. The most significant limitation is that this product is unsuitable for supervised or directly observed drug tests. In these common scenarios—like probation, DOT physicals, or certain federal protocols—observers are instructed to watch the urine stream leave the donor’s body, making discreet substitution impossible.
Furthermore, the margin for error is razor-thin. Temperature is the single most critical factor; the sample must be submitted between 90°F and 100°F. Failure here is the most common reason for rejection. You might worry about the temperature strip failing or the heating pad being a dud—these are valid concerns, which is why testing with the included components beforehand is crucial. The psychological stress of smuggling the sample into a testing facility is another tangible con, often leading to nervous behavior that can increase scrutiny.
Addressing common objections head-on: yes, the heating pad can underperform during long waiting room delays, and the separate temperature strip in some kits can feel like a DIY project. The bottle cap’s click and the lack of natural foam are also noted failure points. These aren’t hypotheticals; they are documented reasons for failure.
Weighing these trade-offs means acknowledging that Test Clear’s value is directly tied to your specific test type and your commitment to flawless execution. That calculus naturally leads to another key question: how do these pros and cons stack up against other synthetic urine brands on the market?
How Does Test Clear Compare to Other Synthetic Urine Brands?
How does Test Clear stack up against other brands you might see online? When you’re comparing options, the differences come down to three things: the formula itself, the tools included, and—critically—how labs view them.
Let’s break it down with a quick comparison of the key players:
| Brand | Formula Type | Key Differentiator | Price Range |
|---|---|---|---|
| Test Clear | Powdered (real dehydrated urine) | Requires manual mixing; no biocides. | $59.95 – $69.95 |
| Quick Fix | Pre-mixed liquid | Contains biocides; offers batch verification. | $39.95 – $44.95 |
| UPass | Pre-mixed liquid | Budget option; mixed user reviews on consistency. | ~$29.95 |
| Sub Solution | Powdered (biocide-free) | Includes heat activator powder for instant temp. | Premium Tier |
The core differentiator is the powdered formula. Unlike pre-mixed liquids like Quick Fix or UPass, Test Clear and Sub Solution synthetic urine start as a dry powder. This eliminates the need for the biocides or preservatives required to keep liquid formulas from degrading over time. For you, that translates to a chemically fresher sample with a longer unopened shelf life—often over two years.
But that powder form introduces a trade-off: preparation complexity. You must mix it precisely with water, a step that pre-mixed brands avoid. This is where user error can creep in, potentially affecting pH or specific gravity if the ratio is off.
Then there’s the elephant in the room: detection rumors. You’ve probably heard whispers that certain brands are “flagged” by labs like Quest or LabCorp. While no brand can guarantee invisibility, the concern often centers on outdated formulas lacking key biomarkers like uric acid or urea, or the presence of biocides that advanced validity testing can sometimes identify. Test Clear’s use of real human urine components is designed to sidestep these flags, but its success still hinges on your flawless execution of the temperature and preparation steps.
The included accessories also vary. Test Clear provides a standard air-activated heater, while premium options like Sub Solution offer a heat activator powder for on-demand temperature control—a tangible advantage if you can’t access a microwave.
Ultimately, Test Clear’s value proposition is its powdered, biocide-free design aimed at authenticity. But regardless of which brand you choose, proper storage and knowing the product’s limits are non-negotiable for success.
Shelf Life, Storage, and Reheating: Keeping Your Kit Ready
Let’s address a critical planning question: can you stock up? The short answer is yes, but with clear rules. The unmixed powder in your Test Clear kit has a major advantage—its shelf life is exceptionally long when stored correctly.
The Powder’s Stability
The unmixed, powdered urine is designed for long-term storage. When kept sealed in its original container, in a cool, dry place away from direct sunlight and humidity, the powder remains viable indefinitely. User reports confirm successful use after two to three years, provided the powder retains its original tan color. There is no printed expiration date, but proper storage is your guarantee of readiness. This makes it a practical option to have on hand for surprise tests or future needs.
Once Mixed: The 72-Hour Rule
The dynamics change completely once you add water and mix the sample. According to the manufacturer, a prepared synthetic urine sample is viable for up to 72 hours if refrigerated and kept in a sealed vial. At room temperature, this window shrinks dramatically; same-day use is strongly recommended for optimal results.
Reheating: The Safe Method
If you refrigerate a mixed sample, you must reheat it properly. The only approved method is using the provided single-use, air-activated heaters. You must bring the sample back into the precise 90-100°F range. Crucially, the manufacturer advises against using a microwave or boiling water for reheating, as these methods can alter the sample’s chemical properties and appearance. Reheating more than once or using a sample older than 72 hours risks test failure.
Your Actionable Takeaway
Plan ahead by storing the unmixed kit properly. If you prepare a sample, treat it with the same urgency as a real test—use it within the day or refrigerate it with a strict 72-hour deadline. Following these guidelines ensures your kit is reliable when you need it most.
Who Makes Test Clear? Manufacturer Overview and Trustworthiness
But the truth is, a product’s reliability often starts with who stands behind it. Test Clear is manufactured by a company that has been in the business for over 20 years. Their stated focus is on creating laboratory-grade synthetic urine formulas. This longevity isn’t just a number—it suggests a level of operational stability and product refinement that fly-by-night brands simply can’t match.
When you’re weighing a solution with tangible stakes, knowing the manufacturer has a two-decade track record provides a foundational layer of credibility. It positions them as a more established player in a market where consistency is everything.
Where to Buy Test Clear Synthetic Urine Safely and Discreetly
So, you’ve done your research on the formula and the company. The next logical question is: where do you actually get it? This step is just as critical as the preparation itself, because where you buy directly impacts what you get.
Your Safest Bet: The Official Source
To guarantee you’re getting an authentic, unexpired product, your first and best option is the official Test Clear website. Purchasing directly from the manufacturer eliminates the guesswork and risk that comes with third-party sellers. You’re not just buying the kit—you’re buying the assurance that it’s been stored correctly, is within its usable shelf life, and is the genuine formula you’ve read about.
The Discreet Shipping Advantage
A major benefit of ordering from the official source is the privacy it affords. Reputable manufacturers understand the need for discretion. Your order will typically arrive in plain, unmarked packaging with no indication of the contents inside. This protects your privacy from prying eyes at home or in a shared mailbox, which is a tangible concern when you’re managing a stressful situation.
A Note on Price and Other Retailers
While you might find synthetic urine on general marketplaces or in local head shops, these avenues carry significant risks. Products may be counterfeit, expired, or stored improperly, compromising their effectiveness. The general price for a reliable, lab-grade kit like Test Clear typically falls in the range of $50 to $90. Paying for authenticity from the official channel is an investment in the reliability you need when the stakes are high.
Practical Tips and Common Mistakes with Test Clear Synthetic Urine
Let’s be clear: the difference between a passed test and a failed one often comes down to avoiding a handful of common,experience-based mistakes. The product itself is a tool—its impact depends entirely on your preparation. Here are the granular,actionable lessons learned from people who’ve navigated this process successfully.
The Non-Negotiable: Master Temperature Control
The single biggest reason for rejection is submitting a sample outside the 90–100°F window. Labs check this within four minutes of collection. Your goal is to present a sample at 96-98°F to mimic fresh human urine perfectly.
Common Pitfalls & Proactive Solutions:
- Mistake: Relying solely on body heat. Your body alone cannot maintain the required temperature. A sample will drop 1-2°F per minute in ambient air and can fall below 90°F in under 30 minutes without an active heat source.
- Solution: Use the provided heating pad as your primary heat source. Attach it to the vial opposite the temperature strip. Placing it directly under the strip will cause it to read the pad’s heat (2-4°F higher) instead of the liquid’s actual temperature,leading to a false sense of security.
- Mistake: No backup plan for the heater. Heating pads can be duds or activate inconsistently.
- Solution: Carry a spare,second hand warmer. This is your insurance policy. If your primary heater fails or the wait is unexpectedly long,you have a ready replacement.
- Mistake: Overheating the sample in the microwave. Nuking it for longer than 10 seconds—or with the cap on—risks pressure buildup and can degrade the chemical composition,causing it to fail validity tests.
- Solution: Heat in short,controlled bursts. Follow the kit’s instructions precisely. A brief,10-second zap is typically sufficient to reach the target range from room temperature.
Avoid Drawing Unwanted Attention
Discretion is paramount. Your preparation should account for the quiet,scrutinized environment of a clinic restroom.
- Mistake: Using a container with a loud,clicking cap. In a silent bathroom,that snap can be a dead giveaway.
- Solution: Practice opening your kit at home. If the cap is noisy,plan your handling accordingly—some users gently pre-loosen it before entering,ensuring a silent pour. The context doesn’t specify Test Clear’s cap noise level,so this is a critical check during your practice run.
- Mistake: Letting the temperature strip become unreadable. Condensation from body heat or friction against skin can rub the strip off or obscure the reading.
- Solution: Position the vial so the strip faces away from direct skin contact. Before you check it,you can gently wipe away any condensation for a clear,accurate reading.
The Ultimate Rehearsal: Your Practice Run
You wouldn’t give a major presentation without a rehearsal. This is no different.
- Mistake: Going in blind on test day. This amplifies anxiety and increases the chance of fumbling.
- Solution: Conduct a full practice run at home. Simulate the entire process—heating,attaching the warmer,hiding the vial in your clothing,and checking the temperature strip after 30 minutes. This builds muscle memory,quantifies how your chosen hiding spot maintains heat,and gives you tangible confidence.
Advanced Awareness: What the Lab is Checking
While you can’t control the lab’s technology,understanding their process helps you appreciate why meticulous preparation matters. Beyond temperature,validity checks can flag samples for:
- Creatinine levels below 20 mg/dL.
- Specific gravity outside the normal human range (approx. 1.003–1.030).
- pH levels outside 4.5–8.0.
- An absence of natural biomarkers or foam,and unnatural odor—all observable signs that can flag a sample for further testing.
By translating these user-reported pains into a proactive checklist,you align your actions with the proven path to success. The product provides the formula; your flawless execution provides the impact.
Key Takeaways for Beginners: Is Test Clear Right for You?
So, is Test Clear the right move for you? Let’s break it down to a simple, actionable decision.
The bottom line: This is a specialized tool for a specific, high-stakes job—passing an unsupervised drug test where the consequence of failing is severe. It’s not a magic bullet. Its impact is entirely tied to your execution.
The non-negotiable factor is temperature. The lab will reject your sample if it’s outside the 90–100°F range within four minutes of submission. This is the single most common point of failure. Your preparation—getting it to that 96–98°F sweet spot and keeping it there—is everything.
Weigh the trade-off honestly. You are trading the intense stress and risk of using a synthetic product for the potential reward of passing your test and securing your job or freedom. It requires careful planning and nerves of steel.
To self-assess if this aligns with your situation, ask yourself:
- Is my test unsupervised? If someone will be watching you, this method carries substantial risk and is not advised.
- Can I meticulously manage the temperature? This means having a plan for heating, hiding, and maintaining the sample’s warmth until submission.
- Do I understand the risks? While well-regarded, no method is 100% foolproof against advanced lab scrutiny.
If you’ve answered “yes” to these points, Test Clear is a credible option worth considering. If you’re hesitant about the process or facing a supervised test, it may be wiser to explore our comprehensive guide on how to pass a urine drug test using alternative methods.


